How To Create APK In Android Studio in 2024

How to create APK in Android Studio can sometimes feel like navigating through a maze, especially for beginners or those who’ve dabbled in app development but haven’t yet mastered the ins and outs of the Android development environment. The process involves more than just writing code; it encompasses setting up your development environment, configuring app settings, and understanding the nuances of Android Studio. This complexity can turn what should be an exciting final step in app development into a daunting task.
However, there’s good news. You’re not alone in this journey. We understand the hurdles and frustrations of compiling your app into a shareable, distributable format. That’s why we’ve crafted this comprehensive guide, which promises to walk you through every step of how to create APK In Android Studio, making the process as straightforward as possible.
By the end of this article, you will clearly understand how to efficiently create an APK and gain insights into best practices and troubleshooting common issues. Whether you’re looking to distribute your app through the Google Play Store or share it directly with users, this guide has you covered. So, let’s dive in and demystify the process of creating an APK, turning your app development journey from a challenging endeavor into a triumphant success.
APK Creation and Distribution Checklist
| Step | Description | Importance |
|---|---|---|
| Setting Up Android Studio Environment | Ensure Android Studio and SDK are up to date. | Essential |
| Project Configuration | Set up your new project with the correct settings. | Essential |
| Gradle Configuration | Configure your Gradle build files for APK generation. | Essential |
| Generating a Signed APK | Sign your APK for secure distribution. | Essential |
| Building the APK | Use the Build menu to generate your APK. | Essential |
| Testing Your APK | Test on emulators and real devices for compatibility. | Essential |
| Troubleshooting | Resolve any issues encountered during APK generation. | Important |
| Distributing Your APK | Follow guidelines for distribution on Google Play and others. | Essential |
| Best Practices | Apply best practices for security and performance. | Important |
Setting Up Your Android Studio Environment
How to Ensure Your Environment Is Ready for APK Creation: Verify that the JDK (Java Development Kit) is correctly set up and that Android Studio can locate it. This step is crucial for the APK creation process. Next, configure your emulator or connect a physical device to test the app as you develop. Finally, ensure you have accepted all necessary licenses in the SDK manager to avoid build errors.
Starting a New Project in Android Studio
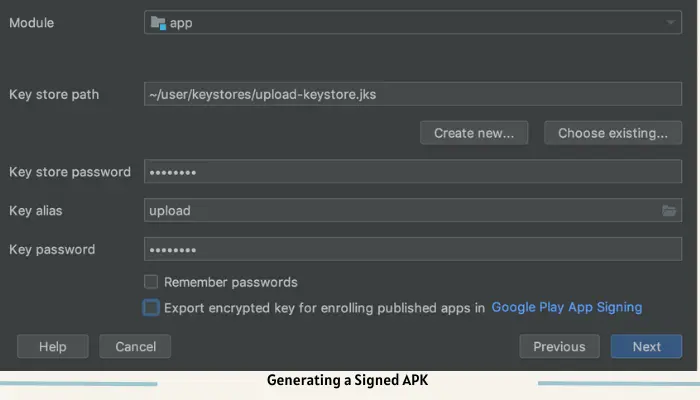
Steps to Create a New Project: Launch Android Studio and select “Start a new Android Studio project.” Choose your desired project template based on the type of app you’re creating. Next, fill in your application name, company domain, and project location. Finally, select your app’s target Android devices and minimum SDK version to ensure compatibility.
Tips for Configuring Your Project for Success: Pay special attention to the naming conventions and organization of your files and resources from the start. This practice helps maintain a clean project structure, making it easier to navigate and manage as your project grows. Additionally, consider setting up version control (like Git) early to track changes and collaborate more effectively.
Configuring Gradle Build Files
Understanding Gradle Scripts: Gradle is a powerful build system used by Android Studio. It automates building your app, managing dependencies, and customizing the build to suit various development and release configurations. The critical files are built. Gradle (Project) and build. Gradle (Module: app), where you define your project’s global and module-specific build configurations.
Read our well Researched Latest Blog Posts
Modifications Needed in Gradle for APK Generation: To prepare your project for APK generation, you might need to adjust settings in the build—gradle (Module: app) file. For instance, setting up signing configurations for release builds is essential for creating a signed APK that can be distributed through the Google Play Store. Additionally, consider specifying minifyEnabled to true for release builds to reduce the APK size and secure your app’s code.
By following these steps and tips, you’re well on your way to setting up a solid foundation for your Android app development and ensuring a smooth APK creation process.
Generating a Signed APK
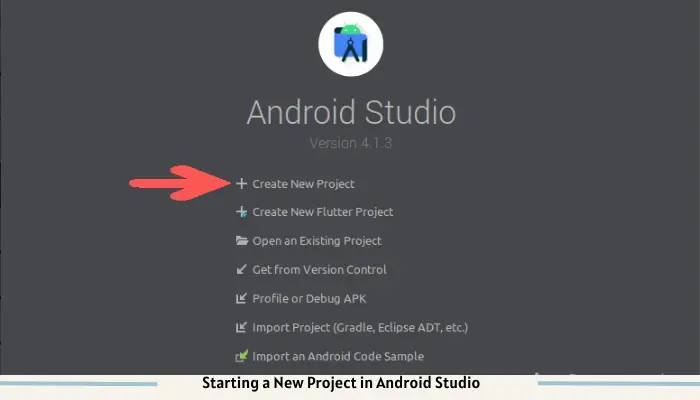
The Significance of Signing Your APK: Signing your APK is critical before distributing your app. It ensures the APK’s integrity and authenticity, allowing Android devices to trust and install your app. A signed APK is also a requirement for publishing your app on the Google Play Store.
Detailed Steps to Generate a Signed APK Through Android Studio:
Building the APK
How to Use the Build Menu for APK Generation: To build an APK without signing (for testing purposes), navigate to “Build” > “Build Bundle(s) / APK(s)” > “Build APK(s).” This process compiles your app and generates an APK in the project’s output directory.
Differences Between Debug and Release APKs: Debug APKs are meant for testing; they contain additional debugging information and are not signed with a release key. Release APKs are signed with your secure key and optimized for user distribution. They usually enable pro guard (code obfuscation), reducing the APK size and protecting your code.
Testing Your APK
Methods for Testing the APK on Emulators and Real Devices: After generating your APK, test it extensively on emulators and real devices. This ensures your app performs well across different device configurations and Android versions. Use Android Studio’s AVD Manager to set up and run emulators with various settings.
Tips for Effective Testing Strategies:
Troubleshooting Common APK Creation Issue
Here are the Solutions to Frequent Problems Encountered During APK Generation:
Distributing Your APK
Guidelines for Distributing Your APK via the Google Play Store and Other Channels: To distribute your app on the Google Play Store:
- Ensure your app complies with Google’s Play Store policies and guidelines.
- Sign in to your Google Play Console account, create a new application, and fill in the app’s details (title, description, etc.).
- Upload your signed APK or App Bundle to the appropriate track (internal, closed, open, or production).
- Set up your app’s store listing, including screenshots, a feature graphic, and a description.
- Publish your app after completing the pricing and distribution sections.
For other channels (like direct download or third-party app stores), ensure your APK is signed and provide clear installation instructions on your website or platform.
Best Practices for APK Creation and Distribution
- Use Proguard or R8: Enable code obfuscation to make your APK challenging to reverse engineer, protecting your app’s code and intellectual property.
- Keep Your Keystore Secure: Your keystore contains the keys to update your app. Please keep it in a secure location and back it up.
- Regularly Update Dependencies: Keep your project’s dependencies up to date to benefit from security patches and performance improvements.
- Test Thoroughly: Beyond functionality tests, include security and performance testing to ensure your app’s quality and user safety.
- Follow Android’s Best Practices: Follow recommended coding, security, and design practices to ensure a high-quality app.
Conclusion
Throughout this article, we’ve covered the essential steps for how to create APK In Android Studio, from setting up your environment and project to configuring build files, signing your APK, testing, troubleshooting, and finally distributing your app. Each step is vital to turning your app idea into a reality users can enjoy and benefit from.
We encourage you to create APKs, experiment with Android Studio‘s capabilities, and explore the vast world of Android app development. Remember, creating an app is a marathon, not a sprint. Take your time, apply best practices, and don’t hesitate to seek help from the affluent community of Android developers. Happy coding, and here’s to your success in bringing your Android app to the world!

